How to make Bluey and Friends Pencil Toppers
Get ready to be the coolest kid in class with these Bluey and friends DIY pencil toppers!
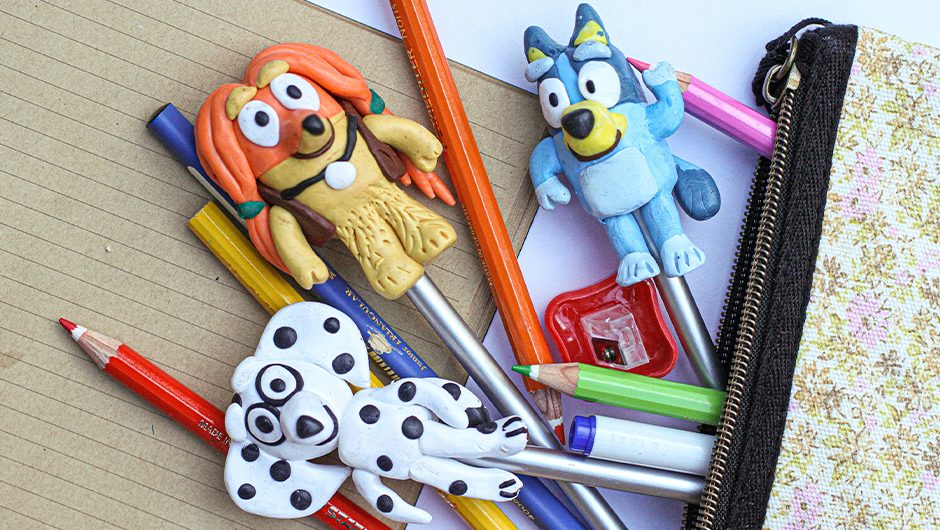
Instructions
To make these toppers we will be using coloured polymer clay. This is a plastic-based clay which comes in a huge range of colours. It’s similar to plasticine except it can be baked in the oven to make it super durable. It has a slightly harder texture than plasticine and works best when warmed up and rolled around in your hands to soften before shaping.
As well as the clay for each character, some simple plastic or wooden clay tools can help. If you don’t have these, a simple wooden skewer and some kitchen utensils will do the trick.
This craft is better suited to slightly older kids and the baking should always be done by an adult.
Chloe
- Start by rolling a small cube of white clay. Press onto the top of a pencil and squeeze to secure.
- Add another slighter larger ball of white clay, this time shaped more like an egg. Use your finger or a wooden or plastic skewer to connect the two sections.
- Take some more white clay and roll it out into a thin sausage shape about 6cm long. Cut in half. Squish the bottom of each piece to make little feet and then attach the legs to the body, making sure to blend well.
- Make another sausage about 4cm long. Cut in half and roll the ends so they come to a gentle point, then use a skewer to make a slight indent to form a paw. Attach these to the side of the body and blend well.
- Roll out some clay to about 2mm thick and cut out two ear shapes as shown in the picture. Attach these to the side of Chloe’s head.
- To make Chloe’s nose, make a small round ball and squeeze the sides to make a slight triangle shape. Attach to the bottom of Chloe’s face. Add a small triangle of black for the nose.
- For the eyes, roll two balls of black and then flatten them into small oval shapes. Attach these above the nose. Do the same with some slighter smaller white balls of clay and then layer these inside the black circles. Squish gently to combine them. To finish, add a small spot of black to each eye for the eyeballs.
- Make a tail by rolling out some white clay and then covering the end with a small amount of black clay. Attach to Chloe’s lower back.
- A Dalmatian needs her spots! Roll lots of very small black balls of clay and press them into Chloe’s body, ears and face.
- Add some white eyebrows above the eyeballs to finish.
- Bake in the oven following the instructions on the back of your clay.
Indy
- Start by rolling a ball of Indy coloured clay. If you can’t find the exact colour, try blending a few colours together till you get the right shade. Squeeze the ball onto the top of a pencil and shape it into a rounded oblong shape. This will be Indy’s body.
- Make a small cone shape and attach it just above the middle half. This will be the start of indy’s nose.
- Roll out some darker orange clay using a plastic or wooden roller. Gently fold this on top of Indy’s head, making sure to cover half her nose. Remove any excess and then blend to make it smooth. Add a small black triangle for the nose.
- Make two thick rectangular shapes for the legs. Squish the bottom of each to make feet and then attach them to Indy’s body. Use a plastic or wooden skewer or tool to make some small lines that look like fur.
- Roll out some dark brown clay. Cut into a wide semi-circle as in the picture. Make a small hole on each side. Wrap this around Indy’s back making sure the holes line up to where her arms should go.
- Roll out some more Indy coloured clay and cut it in half to make two arms. Round one end and press a skewer in to make a paw shape. Attach the arms to the body through the holes in the vest.
- Add Indy’s necklace by rolling some black clay into a very thin sausage. Cut to size and press it onto her chest to attach. Add a small ball of white clay for the charm.
- Roll another very thin sausage of brown for her mouth. Cut to size and attach underneath her nose.
- Roll out some small white balls of clay and flatten them into oval shapes for the eyes. Attach above the nose and then add some small black dots as eyeballs.
- For the hair, roll 8 lengths of orange clay. Make sure each one is around 5cm long. Roll one end of each stand into a point. Add 4 strands to each side, making sure to line up the tops. Blend into the scalp so it looks like her hair is parting.
- Flatten the hair down and use your fingers to pinch each side together into ponytails. Add a small line of green to each side as the hair ties.
- Bake according to packet instructions.
Bluey
- Start with a rounded rectangular blob of blue coloured clay around 4cm long and 2.5 wide. This will be Bluey’s head and body.
- Squeeze gently onto the top of a pencil and reshape if necessary
- Add a small flattened rectangle of yellow to the centre of the body. This is the start of the mouth that we will complete later on.
- Roll out a long flat rectangle of dark blue clay. Make sure it’s nice and thin. Wrap around the top ⅓ of the body as per the picture. Use your fingers to gently squeeze off the excess and then blend to cover the top of the head.
- Roll a small ball of yellow clay and shape into a rectangle with roundish edges. Attach to the middle of the yellow oval with the button of the rectangle lining up with the button middle of the oval shape. Add a small black triangle to finish.
- Roll two equal-sized ovals of white clay and attach them above either side of the top of the nose. Add two teeny dots of black for pupils.
- For Bluey’s tummy, roll out some light blue thinly and cut it into a smallish square. Blend this onto the lower ⅓ of her torso.
- For her ears, make two triangles in dark blue with two smaller triangles of yellow inside. Blend these onto the top of Bluey’s head.
- Make a very thin roll of brown clay and add it to the underside of the nose for her mouth. Trim to fit.
- For Bluey’s feet and hands: Make a roll of blue clay about 8cm long and 3mm wide. Cut into 2cm lengths. Roll 4 balls of light blue clay and squish them onto the ends of each length. Roll again so the 2 colours blend. For the legs, squish the light blue sections and wedge forward to make little feet. Use a skewer to mark some paw lines. For the hands, press a skewer into the blue end to create a simple hand/paw shape. Attach these to the torso and blend to join.
- To finish, add a tail to Bluey’s back and some light blue eyebrows.
- Bake according to packet instructions.